

Quản lý các đơn hàng WooCommerce có thể tốn khá nhiều thời gian, đặc biệt là khi doanh nghiệp của bạn đang phát triển. Việc tích hợp cửa hàng với Google Sheets mang đến một giải pháp linh hoạt và mạnh mẽ để tối ưu hóa quy trình quản lý đơn hàng.
Hướng dẫn này sẽ chỉ cho bạn từng bước để thực hiện việc tích hợp này mà không cần sử dụng bất kỳ plugin nào.
Hướng dẫn từng bước để Đồng bộ hóa Đơn hàng WooCommerce vào Google Sheets
Phương pháp này sẽ sử dụng WooCommerce REST API, Google Apps Script và một đoạn mã PHP nhỏ.
Điều kiện cần thiết
Trước khi bắt đầu, hãy đảm bảo bạn có:
- Một cửa hàng WooCommerce đang hoạt động.
- Một tài khoản Google.
- Quyền truy cập quản trị trị viên (Admin) vào trang web WordPress của bạn.
Kích hoạt WooCommerce REST API
- Đăng nhập vào trang quản trị (Dashboard) WordPress của bạn.
- Điều hướng tới WooCommerce > Settings (Cài đặt) > Advanced (Nâng cao) > REST API.
- Nhấp vào Add Key (Thêm Khóa).
- Điền mô tả, chọn người dùng có đủ quyền hạn và đặt quyền (Permissions) thành Read/Write (Đọc/Ghi).
- Nhấp vào Generate API Key (Tạo khóa API).
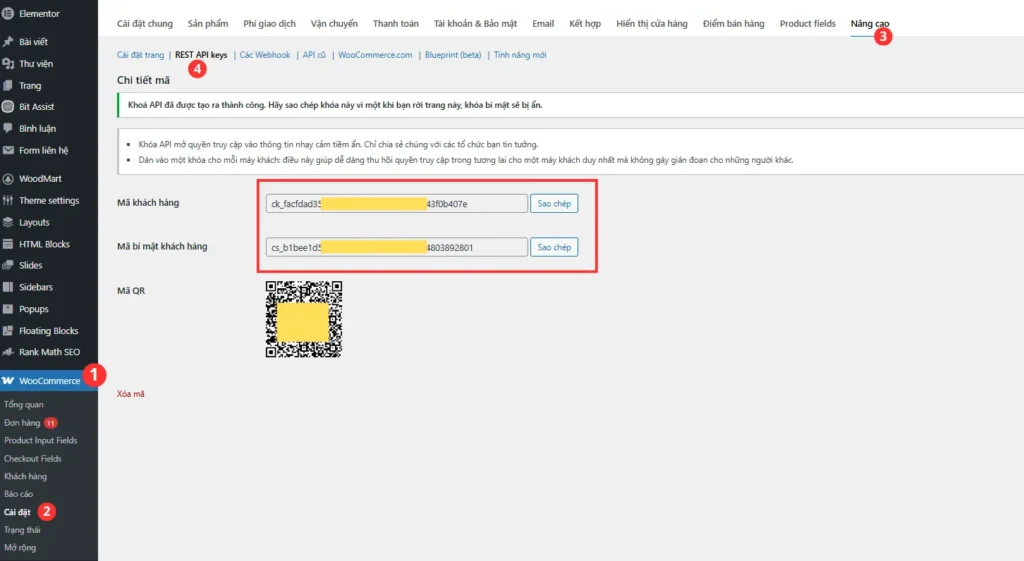
Chúng ta sẽ sử dụng các khóa vừa được tạo cho các bước sau.
Thiết lập Google Apps Script
- Tạo một bảng tính Google Spreadsheet mới.
- Tạo một Sheet mới và đặt tên là “Orders”
- Đi tới Extensions (Tiện ích mở rộng) > Apps Script.
- Dán đoạn mã dưới đây vào trình chỉnh sửa Apps Script:
var consumerKey = 'ck_xxxxxxxxxxxxxxxxxxxxxxxxxxxxxxxxxxxxxxxxxxx'; // Thay bằng Mã khách hàng web tạo tại Rest API Key
var consumerSecret = 'cs_xxxxxxxxxxxxxxxxxxxxxxxxxxxxxxxxxxxxxxxx'; // Thay bằng mã bí mật khách hàng tạo tại Rest API Key
var siteUrl = 'https://domancuaban.com/'; // Thay bằng Domain web của bạn (Bắt buộc có dấu / ở cuối)
var sheetName = 'Orders';
// ==========================================

// Function to create the menu
function onOpen() {
  var ui = SpreadsheetApp.getUi();
  ui.createMenu('Orders')
    .addItem('Fetch orders', 'fetchOrders')
    .addToUi();

  // Ensure the "Orders" sheet exists and has the correct headers
  createOrdersSheet();
}

// Function to create the "Orders" sheet if it doesn't exist and add headers
function createOrdersSheet() {
  var spreadsheet = SpreadsheetApp.getActiveSpreadsheet();
  var sheet = spreadsheet.getSheetByName(sheetName);

  if (!sheet) {
    sheet = spreadsheet.insertSheet(sheetName);
    var headers = ['ID', 'Status', 'Name', 'Phone', 'Billing', 'Products', 'Total', 'Date'];
    sheet.appendRow(headers);

    // Set data validation for the "Status" column
    var statusRange = sheet.getRange(2, 2, sheet.getMaxRows());
    var statusRule = SpreadsheetApp.newDataValidation()
      .requireValueInList(['processing', 'on-hold', 'completed', 'cancelled', 'pending', 'refunded'], true)
      .build();
    statusRange.setDataValidation(statusRule);

    // Format the header
    var headerRange = sheet.getRange(1, 1, 1, headers.length);
    headerRange.setFontWeight('bold')
               .setHorizontalAlignment('center')
               .setBackground('#A52A2A') // Brown background
               .setFontColor('#FFFFFF'); // White text

    // Freeze the top row
    sheet.setFrozenRows(1);

    // Format the "Total" column as number with comma separation
    var totalRange = sheet.getRange(2, 7, sheet.getMaxRows());
    totalRange.setNumberFormat('#,##0.00');

    // Format the "Date" column as date
    var dateRange = sheet.getRange(2, 8, sheet.getMaxRows());
    dateRange.setNumberFormat('yyyy-MM-dd');

    // Left-align the "ID" column
    var idRange = sheet.getRange(2, 1, sheet.getMaxRows());
    idRange.setHorizontalAlignment('left');
  }
}

// Function to fetch orders from WooCommerce
function fetchOrders() {
  var sheet = SpreadsheetApp.getActiveSpreadsheet().getSheetByName(sheetName);
  var lastRow = sheet.getLastRow();
  var page = Math.ceil(lastRow / 10); // Calculate the page number based on the number of rows

  var options = {
    'method': 'get',
    'muteHttpExceptions': true,
    'headers': {
      'Authorization': 'Basic ' + Utilities.base64Encode(consumerKey + ':' + consumerSecret)
    }
  };

  var url = siteUrl + 'wp-json/wc/v3/orders?per_page=10&page=' + page;
  var response = UrlFetchApp.fetch(url, options);
  var orders = JSON.parse(response.getContentText());

  if (orders.length > 0) {
    addOrdersToSheet(orders);
  } else {
    SpreadsheetApp.getUi().alert('No more orders to fetch.');
  }
}

// Function to add orders to the sheet
function addOrdersToSheet(orders) {
  var sheet = SpreadsheetApp.getActiveSpreadsheet().getSheetByName(sheetName);
  var data = [];
  orders.forEach(function(order) {
    var status = order.status;
    var name = order.billing.first_name + ' ' + order.billing.last_name;
    var phone = order.billing.phone;
    var billing = [order.billing.address_1, order.billing.address_2, order.billing.city, order.billing.state, order.billing.postcode, order.billing.country, order.billing.email].filter(Boolean).join(', ');
    var products = order.line_items.map(function(item) { return item.name; }).join(', ');
    var total = order.total;
    var date = new Date(order.date_created).toISOString().split('T')[0];

    data.push([order.id, status, name, phone, billing, products, total, date]);
  });

  sheet.getRange(sheet.getLastRow() + 1, 1, data.length, data[0].length).setValues(data);
}

// Function to update order status
function onEdit(e) {
  var range = e.range;
  var sheet = range.getSheet();
  var column = range.getColumn();
  var row = range.getRow();

  if (sheet.getName() === sheetName && column === 2) {
    var orderId = sheet.getRange(row, 1).getValue();
    var newStatus = range.getValue();
    updateOrderStatus(orderId, newStatus);
  }
}

// Function to update order status in WooCommerce
function updateOrderStatus(orderId, newStatus) {
  var options = {
    'method': 'put',
    'muteHttpExceptions': true,
    'headers': {
      'Authorization': 'Basic ' + Utilities.base64Encode(consumerKey + ':' + consumerSecret),
      'Content-Type': 'application/json'
    },
    'payload': JSON.stringify({
      'status': newStatus
    })
  };

  var url = siteUrl + 'wp-json/wc/v3/orders/' + orderId;
  var response = UrlFetchApp.fetch(url, options);
  Logger.log(response.getContentText());
}

// Function to handle incoming data from PHP script
function doPost(e) {
  try {
    // Parse the incoming JSON data
    var order = JSON.parse(e.postData.contents);

    // Get the active sheet for processing orders
    var sheet = SpreadsheetApp.getActiveSpreadsheet().getSheetByName(sheetName);
    var orderId = order.id;
    var orderRow = findOrderRow(orderId);

    if (orderRow) {
      // Update existing order
      updateOrderInSheet(orderRow, order);
    } else {
      // Add new order
      addNewOrderToSheet(order);
    }

    // Respond to the request
    return ContentService.createTextOutput('Order received').setMimeType(ContentService.MimeType.TEXT);

  } catch (error) {
    // Log any errors to the console
    Logger.log('Error in doPost: ' + error.message);

    // Return an error message
    return ContentService.createTextOutput('Error processing the order').setMimeType(ContentService.MimeType.TEXT);
  }
}


// Function to find the row of an existing order by ID
function findOrderRow(orderId) {
  var sheet = SpreadsheetApp.getActiveSpreadsheet().getSheetByName(sheetName);
  var data = sheet.getDataRange().getValues();
  for (var i = 1; i < data.length; i++) {
    if (data[i][0] == orderId) {
      return i + 1; // Return the row number (1-based index)
    }
  }
  return null;
}

// Function to update an existing order in the sheet
function updateOrderInSheet(row, order) {
  var sheet = SpreadsheetApp.getActiveSpreadsheet().getSheetByName(sheetName);
  var status = order.status;
  var name = order.name;
  var phone = order.phone;
  var billing = order.billing;
  var products = order.products;
  var total = order.total;
  var date = order.date;

  var data = [order.id, status, name, phone, billing, products, total, date];
  sheet.getRange(row, 1, 1, data.length).setValues([data]);
}

// Function to add a new order to the top of the sheet
function addNewOrderToSheet(order) {
  var sheet = SpreadsheetApp.getActiveSpreadsheet().getSheetByName(sheetName);
  var status = order.status;
  var name = order.name;
  var phone = order.phone;
  var billing = order.billing;
  var products = order.products;
  var total = order.total;
  var date = order.date;

  var data = [[order.id, status, name, phone, billing, products, total, date]];

  // Insert the new order at the top of the sheet
  sheet.insertRowBefore(2);
  sheet.getRange(2, 1, 1, data[0].length).setValues(data);
}
Lưu ý quan trọng: Bạn cần thay thế các biến sau ở đầu đoạn mã:
consumerKey: Khóa Consumer API của WooCommerce (lấy ở Bước 1).consumerSecret: Mã bảo mật Consumer API của WooCommerce (lấy ở Bước 1).siteUrl: Đường dẫn URL trang web WordPress của bạn (ví dụ:https://tenmiencuaban.com/).
Cấu hình Trình kích hoạt (Triggers)
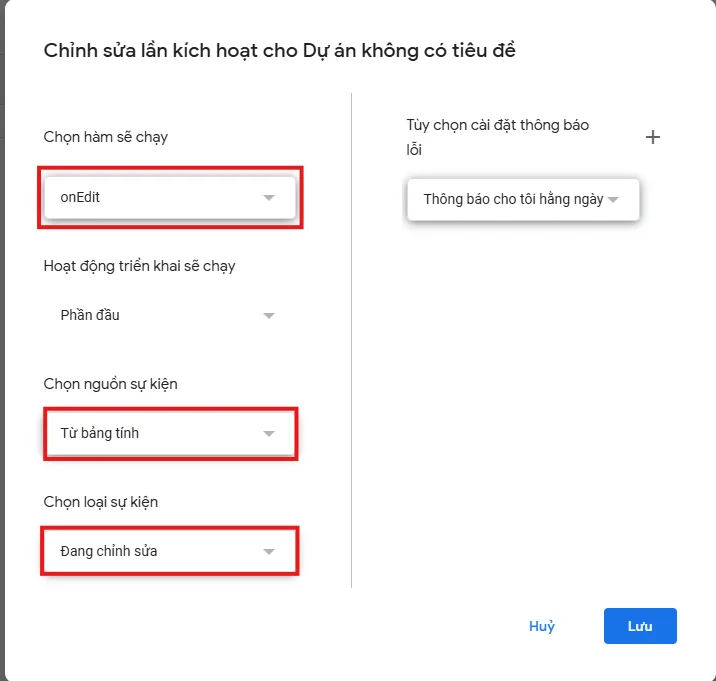
- Trong Apps Script, nhấp vào biểu tượng đồng hồ “Triggers” ở thanh menu bên trái.
- Nhấp vào “Add Trigger” (Thêm trình kích hoạt).
- Cài đặt các thông số như sau:
- Choose function (Chọn hàm):
onEdit - Event type (Loại sự kiện):
On edit(Khi chỉnh sửa)
- Choose function (Chọn hàm):
- Lưu cấu hình của bạn.
Triển khai Ứng dụng (Deploy)
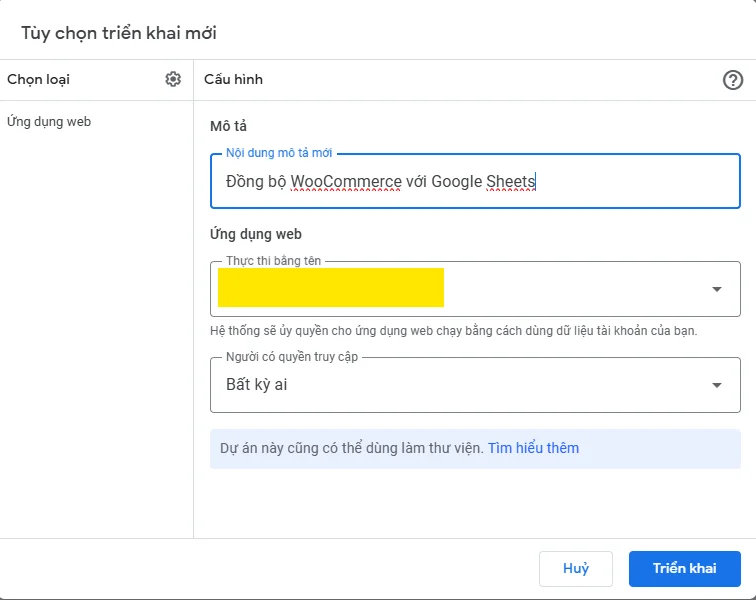
- Trong trình chỉnh sửa Apps Script, nhấp vào “Deploy” (Triển khai) ở góc phải phía trên > chọn “New deployment” (Bản triển khai mới).
- Tại mục “Select type”, hãy chọn biểu tượng bánh răng và chọn “Web app” (Ứng dụng web).
- Ở phần “Execute the app as” (Thực thi dưới quyền): chọn “Me” (Tôi), và ở phần “Who has access” (Ai có quyền truy cập): chọn “Anyone” (Bất kỳ ai).
- Nhấp vào “Deploy” (Triển khai).
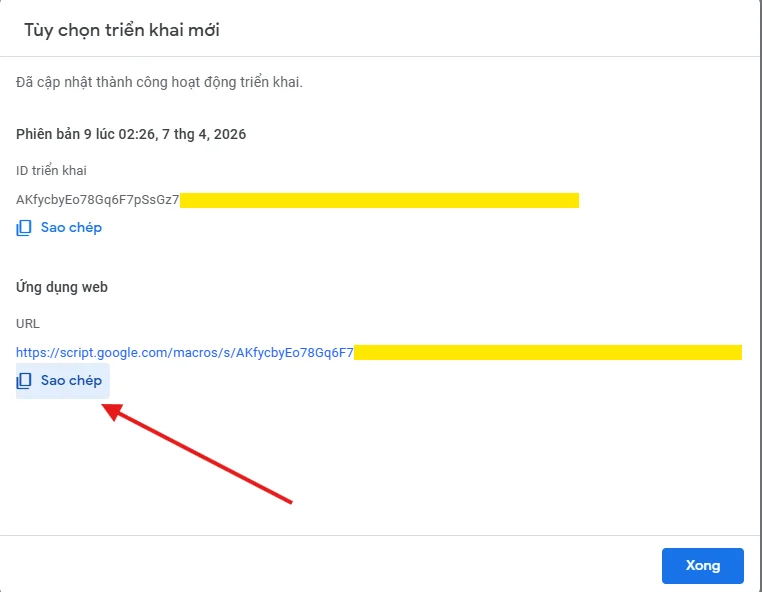
- Cho phép (Authorize) ứng dụng truy cập vào Google Drive/Bảng tính của bạn.
- Khi hoàn tất, hãy sao chép URL của Web app vừa được tạo.
Thêm mã PHP vào Website WordPress của Bạn
Hãy thêm đoạn mã PHP sau vào trang web WordPress của bạn (ví dụ: thêm vào cuối tệp functions.php của giao diện hoặc sử dụng trong plugin).
Lưu ý: Nếu sửa file functions.php, hãy đảm bảo bạn đang sử dụng Child Theme để tránh mất mã khi cập nhật theme. Ngoài ra, bạn có thể cài plugin “Code Snippets” để thêm mã một cách an toàn nhất.
add_action('woocommerce_checkout_order_processed', 'send_order_to_google_sheets', 10, 1);
add_action('woocommerce_order_status_changed', 'send_order_to_google_sheets', 10, 4);

function send_order_to_google_sheets($order_id, $old_status = '', $new_status = '', $order = null) {
    // THAY THẾ URL DƯỚI ĐÂY BẰNG WEB APP URL Ở BƯỚC 4
    $url = 'https://script.google.com/macros/s/00000000000000000000000000000/exec';

    if (!$order) {
        $order = wc_get_order($order_id);
    }

    if (!$order) {
        error_log('Invalid order ID: ' . $order_id);
        return;
    }

    $order_data = array(
        'id'       => $order->get_id(),
        'status'   => $order->get_status(),
        'name'     => $order->get_billing_first_name() . ' ' . $order->get_billing_last_name(),
        'phone'    => $order->get_billing_phone(),
        'billing'  => implode(', ', array_filter(array(
            $order->get_billing_address_1(),
            $order->get_billing_address_2(),
            $order->get_billing_city(),
            $order->get_billing_state(),
            $order->get_billing_postcode(),
            $order->get_billing_country(),
            $order->get_billing_email()
        ))),
        'products' => implode(', ', array_map(function($item) {
            return $item->get_name();
        }, $order->get_items())),
        'total'    => $order->get_total(),
        'date'     => $order->get_date_created() ? $order->get_date_created()->date('Y-m-d') : ''
    );

    $data_json = wp_json_encode($order_data);

    $args = array(
        'body'    => $data_json,
        'headers' => array(
            'Content-Type' => 'application/json',
        ),
    );

    $response = wp_remote_post($url, $args);

    if (is_wp_error($response)) {
        error_log('Error sending order data to Google Sheets: ' . $response->get_error_message());
    } else {
        $response_code = wp_remote_retrieve_response_code($response);
        if ($response_code !== 200) {
            error_log('Unexpected response code: ' . $response_code . '. Response: ' . wp_remote_retrieve_body($response));
        }
    }
}
Hãy đảm bảo thay thế biến $url bằng Web app URL mà bạn đã copy được ở Bước 4. Đoạn mã PHP này sẽ đóng vai trò như chiếc cầu nối để gửi dữ liệu từ WordPress sang Google Apps Script.
Đồng bộ (Fetch) Đơn hàng
Bây giờ, hãy quay lại làm mới (F5) trang Google Sheets của bạn. Bạn sẽ thấy một menu mới có tên là “Orders”.
- Nhấp vào Orders > Fetch orders để hệ thống lấy 10 đơn hàng gần nhất.
- Cứ mỗi lần nhấp, nó sẽ lấy tiếp 10 đơn hàng kế tiếp và điền vào bảng tính.
Các cột dữ liệu trên Google Sheets
Những đơn hàng đồng bộ trên Google Sheets của bạn sẽ bao gồm những cột sau:
- ID: Số ID của đơn hàng.
- Status (Trạng thái): Tình trạng hiện tại (VD: Processing, Completed, Cancelled). Bạn hoàn toàn có thể thay đổi trạng thái ngay tại Google Sheets và nó sẽ đồng bộ lại lên WooCommerce.
- Name (Tên): Họ tên đầy đủ của khách.
- Phone (SĐT): Số điện thoại của khách hàng.
- Billing (Thanh toán): Địa chỉ thanh toán và email.
- Products (Sản phẩm): Danh sách các mặt hàng đã mua.
- Total (Tổng tiền): Tổng giá trị của đơn hàng.
- Date (Ngày tháng): Ngày tạo đơn.
Đồng bộ hóa Hai Chiều (Two-Way Synchronization)
Hệ thống này cung cấp khả năng đồng bộ hai chiều mạnh mẽ. Khi bạn cập nhật tình trạng đơn hàng trên Google Sheets, trạng thái đó cũng sẽ tự động đổi trong WooCommerce. Ngược lại, khi có bất kỳ đơn hàng mới nào tạo ra trên WooCommerce, nó sẽ tự động được thêm lên đầu danh sách trên Google Sheets của bạn.
Kết luận
Giải pháp tích hợp này hỗ trợ bạn tự động hóa quy trình quản lý đơn hàng mà không cần phải bỏ tiền mua các plugin đắt đỏ hay sử dụng các quy trình thiết lập lằng nhằng. Nó cực kỳ hữu ích cho các doanh nghiệp vừa và nhỏ muốn tối ưu hóa hiệu suất xử lý đơn hàng trong khi vẫn đảm bảo sự đồng nhất dữ liệu trên mọi nền tảng.